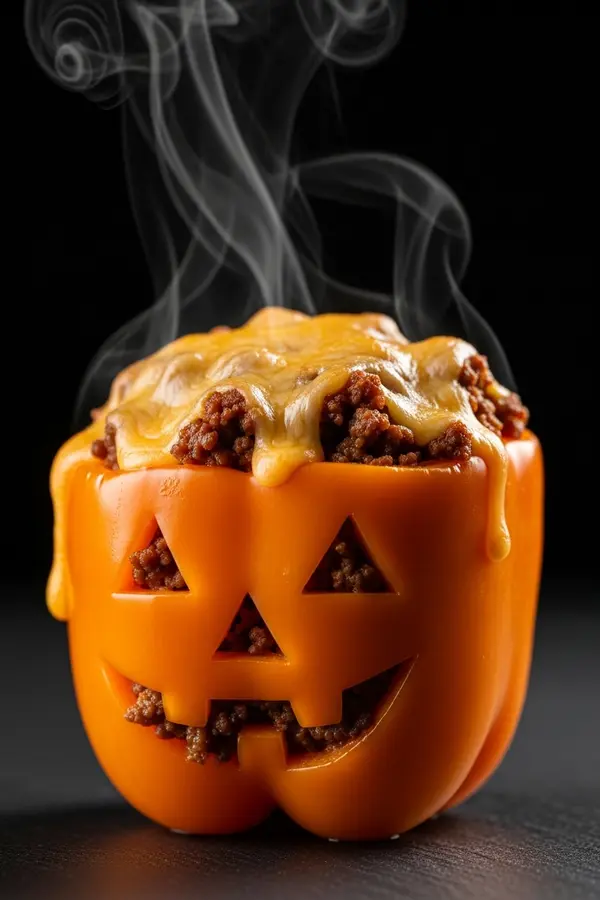
Want Halloween dinner that’s actually fun to make? These Gluten-Free Stuffed Pepper Jack-o’-Lanterns Recipe are spooky, delicious, and way easier than carving real pumpkins. Ready in 30 minutes!
So you want to win Halloween without actually trying that hard? Same. These Stuffed Pepper Jack-o’-Lanterns are basically dinner with a costume on—spooky, delicious, and honestly kind of genius. You’re carving faces into bell peppers (way easier than pumpkins, trust me), stuffing them with seasoned beef or rice, and pretending you’re a culinary mastermind. Your dinner guests don’t need to know this took you like 30 minutes.

Why Gluten-Free Stuffed Pepper Jack-o’-Lanterns Halloween Recipe is Awesome
Look, I’m not saying this recipe will change your life, but it might make your Halloween dinner the talk of the group chat. Here’s why these pepper jack-o’-lanterns slap:
They’re naturally gluten-free. No weird substitutions, no sad gluten-free bread crumbs that taste like cardboard. Just real food that happens to be safe for your gluten-sensitive friends.
They’re Instagrammable as hell. Seriously, carve a goofy face into a pepper, and suddenly you’re a food blogger. The aesthetic does half the work for you.
Kids actually think they’re fun. And by kids, I mean your inner child who still gets excited about Halloween. But also actual children—they’ll eat vegetables if they have faces. It’s science. Probably.
Customizable AF. Beef, turkey, rice, quinoa, beans—throw whatever you want in there. Picky eaters? Not your problem anymore.
Easy cleanup. One baking dish. That’s it. Future you will be grateful.
Ingredients You’ll Need
For the Peppers:
- 4 large bell peppers (orange for max Halloween vibes, but any color works)
- A sharp paring knife (and maybe a prayer if you’re clumsy like me)
For the Filling (Beef Version):
- 1 lb ground beef (or turkey if you’re feeling healthy)
- 1 cup cooked rice (white, brown, cauliflower—your call). And yes, rice is completely gluten-free, so you’re safe using any variety you like.
- 1 small onion, diced
- 2 cloves garlic, minced (or 1 tsp garlic powder if you’re lazy)
- 1 can (14.5 oz) diced tomatoes, drained
- 1 cup shredded cheese (cheddar, mozzarella, or a Mexican blend)
- 1 tsp cumin
- 1 tsp paprika
- Salt and pepper to taste
- 2 tbsp olive oil
For the Filling (Vegetarian Version):
- 2 cups cooked rice or quinoa
- 1 can black beans, drained and rinsed
- 1 cup corn (frozen is fine)
- 1 small onion, diced
- 1 can diced tomatoes, drained
- 1 cup shredded cheese
- Same spices as above
- 2 tbsp olive oil
Optional Toppings:
- Sour cream (BTW, heavy cream is gluten-free too if you want to make your own or add a drizzle for extra richness)
- Fresh cilantro
- Hot sauce (for the brave souls)

Step-by-Step Instructions
1. Preheat your oven to 375°F (190°C). I know, I know—preheating feels like a scam. But do it anyway. Your peppers will thank you.
2. Prep your peppers. Cut off the tops (save them—they’re the “lids” for serving). Scoop out the seeds and membranes. Now comes the fun part: grab your paring knife and carve jack-o’-lantern faces into the front of each pepper. Triangle eyes, zigzag mouths—go wild. Just don’t go too crazy or your filling will leak out like a sad Halloween tragedy.
3. Make the filling. Heat olive oil in a large skillet over medium heat. Toss in the diced onion and cook for about 3-4 minutes until it’s soft and smells amazing. Add the garlic (or garlic powder) and cook for another minute.
4. Add your protein (or not). If you’re doing beef or turkey, add it now. Break it up with a wooden spoon and cook until it’s browned—about 6-8 minutes. Drain any excess grease unless you’re into that. If you’re going vegetarian, skip to the next step.
5. Mix in the good stuff. Add your cooked rice, diced tomatoes, half the cheese, cumin, paprika, salt, and pepper. For the veggie version, add black beans and corn here too. Stir everything together and let it cook for 2-3 minutes so the flavors can mingle. Taste it. Adjust the seasoning. Be the chef you were born to be.
6. Stuff those peppers. Stand your carved peppers upright in a baking dish. Spoon the filling into each one, packing it in gently. Don’t overstuff or they’ll explode (dramatic, but possible). Sprinkle the remaining cheese on top because more cheese is always the answer.
7. Bake. Cover the dish with foil and bake for 30 minutes. Then remove the foil and bake for another 10-15 minutes until the peppers are tender and the cheese is bubbly and slightly golden.
8. Serve and bask in the glory. Let them cool for a couple minutes (molten pepper juice burns are not cute). Top with sour cream, cilantro, or hot sauce if you’re feeling fancy. Pop the pepper “lids” back on for presentation points.
Common Mistakes to Avoid
Skipping the preheat. Look, I get it—waiting is annoying. But if you throw cold peppers into a cold oven, you’re gonna have sad, unevenly cooked peppers. Just preheat.
Carving the faces too big. Your artistic vision is beautiful, but if you cut giant holes, all your filling’s gonna ooze out. Keep the features small and contained.
Forgetting to drain the tomatoes. Nobody wants watery filling. Drain them. Your peppers shouldn’t need a life raft.
Overcooking the peppers. They should be tender, not mushy. Check them around the 30-minute mark and adjust accordingly.
Not seasoning enough. Ground beef and rice are blank canvases. Taste as you go and add more spices if needed. Bland food is a crime against humanity.
Alternatives & Substitutions
No ground beef? Use ground turkey, chicken, or even plant-based crumbles. You could also go full veggie with extra beans and veggies.
Rice alternatives? Quinoa, cauliflower rice, or even couscous work great. Just make sure it’s cooked beforehand.
Cheese-free? Skip it or use a dairy-free cheese. TBH, the filling is flavorful enough to stand alone.
Different peppers? Red, yellow, green—they all work. Orange just screams Halloween. But you do you.
Spice it up. Add jalapeños, chili powder, or a dash of cayenne if you like things hot. Or keep it mild for the kids (and the weak of stomach).
If you’re feeling fancy and want to level up your gluten-free cooking game after mastering these peppers, check out our Gluten-Free Beef Wellington recipe. It’s basically the boss level of stuffed things—way more impressive for dinner parties
FAQ (Frequently Asked Questions)
Can I make these ahead of time?
Yep! Stuff the peppers, cover them, and stick them in the fridge for up to 24 hours. When you’re ready, just pop them in the oven—add an extra 10 minutes to the baking time since they’re cold.
Can I freeze them?
Absolutely. Assemble them, wrap each one individually in foil, and freeze for up to 3 months. Thaw in the fridge overnight before baking.
What if my peppers won’t stand up?
Cut a tiny sliver off the bottom to flatten them. Or nestle them in a muffin tin to keep them upright. Problem solved.
Can I use raw rice?
Nope. The baking time isn’t long enough to fully cook raw rice. Always use pre-cooked rice or you’ll end up with crunchy disappointment.
What if I don’t eat beef or meat?
The veggie version is chef’s kiss. Black beans, corn, and rice with all those spices? You won’t even miss the meat.
Can I use a different cheese?
Sure. Pepper jack adds a nice kick, feta is tangy, and goat cheese is fancy. Use whatever makes your heart (and taste buds) happy.
Final Thoughts
There you have it—Stuffed Pepper Jack-o’-Lanterns that are equal parts spooky and delicious. You’ve got a fun, festive meal that’s actually practical (shocking, I know). Whether you’re feeding a crowd or just trying to make Monday night dinner less depressing, these little guys deliver.
So go ahead, carve some goofy faces, stuff those peppers, and enjoy the fact that you’re eating vegetables without feeling like you’re eating vegetables. Halloween or not, this recipe’s a keeper. Now go impress someone—or yourself—with your new culinary skills. You’ve earned it!
I’m Dr. Shivani, a Kolkata-based nutritionist since 2015. After 10 years of igniting a love for healthy eating in young minds as a High School nutritionist teacher, I now help individuals unlock their full potential through personalized diet plans. My passion for writing and sharing nutrition knowledge (through blogs and observations) keeps my practice fresh and fuels my love for the field!