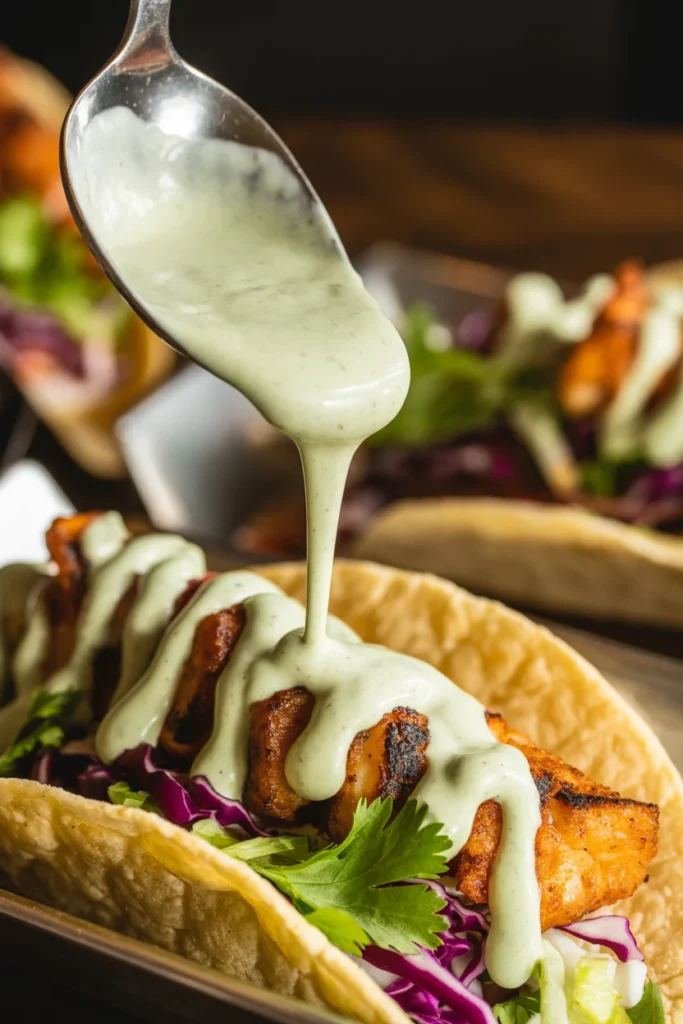
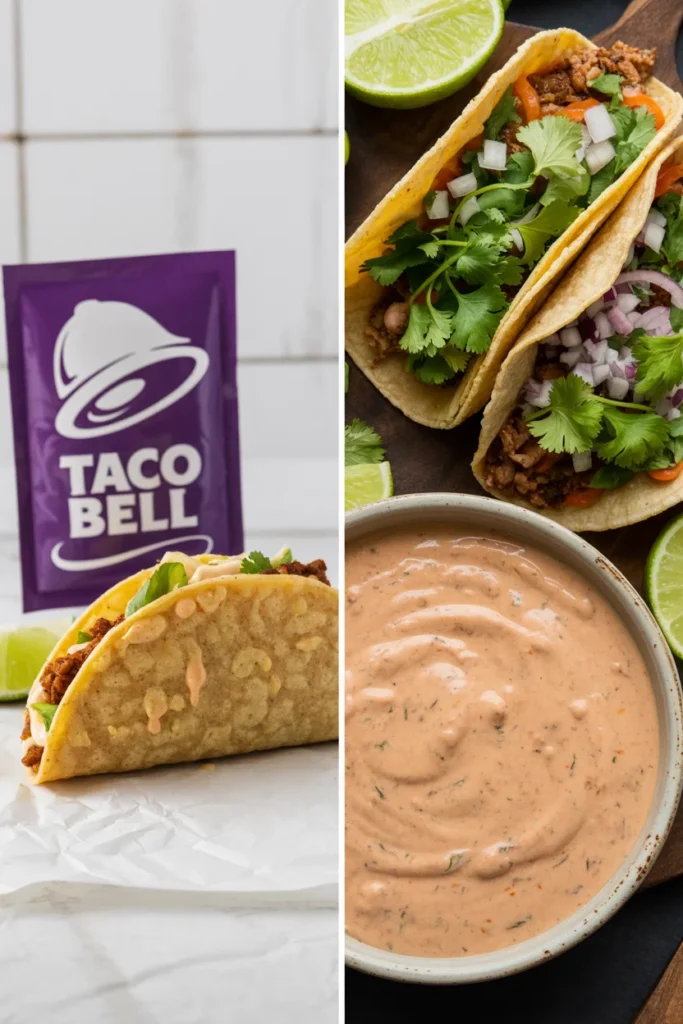
Craving Taco Bell’s ? Make gluten-free Baja sauce recipe in 5 minutes with pantry staples. Creamy, tangy, and way better than the drive-thru version.
So you’ve been haunting the Taco Bell drive-thru at 11 PM for that creamy, dreamy Baja sauce, huh? Same energy. But here’s the kicker—you can make this glorious condiment at home in literally five minutes, and it’s gluten-free without even trying.
No weird ingredients, no selling your soul to fast food corporations, just pure saucy goodness that’ll make your tacos, burritos, and midnight snack sessions infinitely better. Plus, you get to feel like a culinary genius without actually doing anything complicated. Win-win.


Why Gluten-Free Baja Sauce Recipe is Awesome
Listen, I’m not one to oversell things, but this sauce is legitimately game-changing. It’s idiot-proof—and I mean that in the most loving way possible because even I nailed it on the first try, and my kitchen skills are questionable at best.
First off, it takes about five minutes from start to finish. You’re not standing over a stove reducing anything or whisking until your arm falls off. You literally dump stuff in a bowl, stir, and boom—instant upgrade to every meal you eat for the next week.
Second, it’s naturally gluten-free. No substitutions needed, no hunting down specialty ingredients at three different grocery stores. Just regular stuff you probably already have chilling in your fridge. And if you don’t? Everything’s available at any basic supermarket.
Third—and this is important—it tastes better than the actual Taco Bell version. Yeah, I said it. You get to control the spice level, the tanginess, the creaminess. It’s like having the sauce of your dreams customized exactly how you want it. No more sad, watery packets that barely coat your taco.
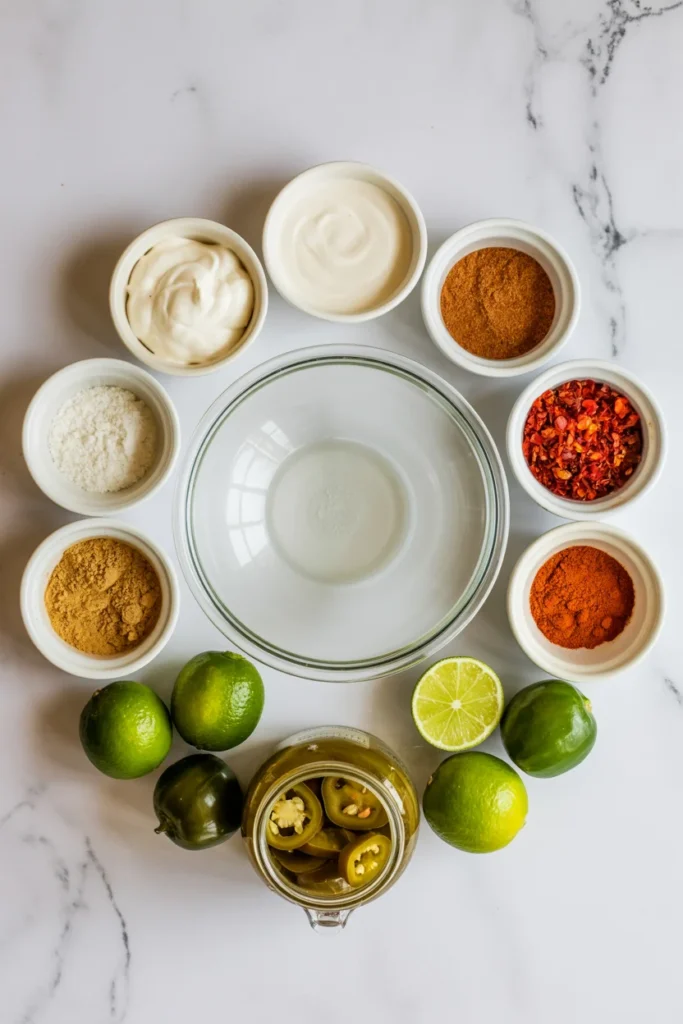


Ingredients You’ll Need
Here’s what you’re gathering for this masterpiece:
- 1 cup mayo (full-fat, don’t be shy—this isn’t the time for diet versions)
- 2 tablespoons sour cream (adds that tangy kick)
- 1 tablespoon lime juice (fresh is best, but bottled works if you’re lazy)
- 1 teaspoon jalapeño juice (from a jar of pickled jalapeños—liquid gold, really)
- 1/2 teaspoon cumin (for that subtle warmth)
- 1/2 teaspoon chili powder (keeps things interesting)
- 1/4 teaspoon garlic powder (because garlic makes everything better)
- 1/4 teaspoon paprika (adds color and mild sweetness)
- Pinch of cayenne pepper (optional, but recommended if you like a little heat)
- Salt to taste (start small, you can always add more)
That’s it. Nine ingredients, most of which are probably already lurking in your kitchen right now.


Step-by-Step Instructions
Ready? Let’s do this thing.
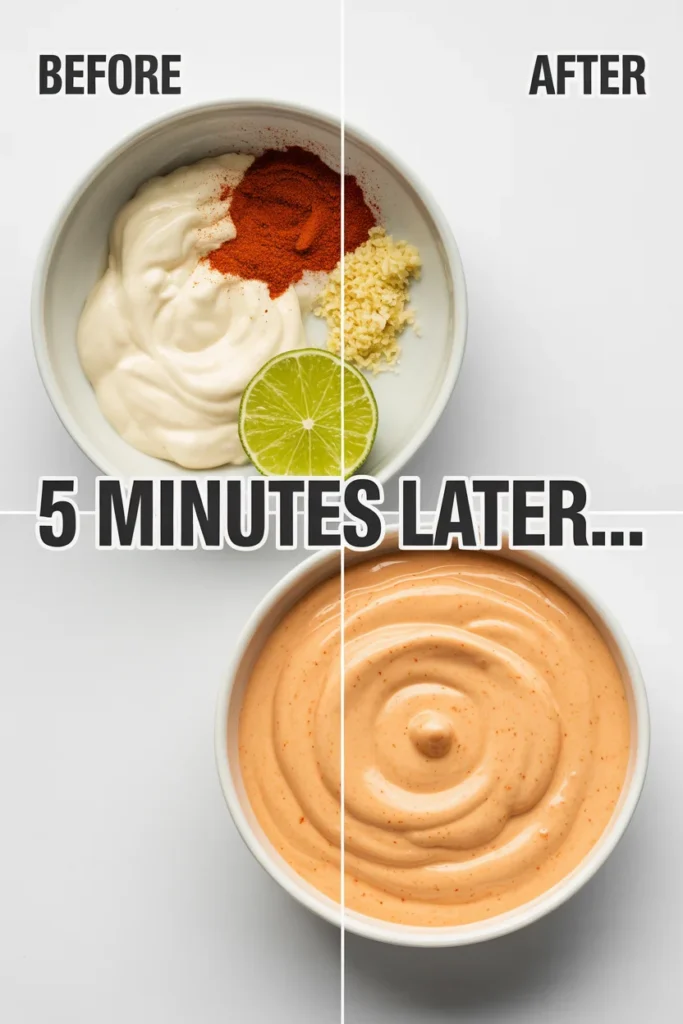
1. Grab a medium bowl. Any bowl will work—doesn’t need to be fancy. Just make sure it’s clean because we’re not cooking this, so whatever’s in that bowl is going straight into your face.
2. Add the mayo and sour cream first. These are your base ingredients, the foundation of sauciness. Plop them in there like you mean it.
3. Squeeze in the lime juice. If you’re using fresh lime, give it a little squeeze test first to make sure it’s not dried out and sad. Nobody wants sad lime juice in their sauce.
4. Pour in the jalapeño juice. This is the secret weapon that gives it that authentic Baja vibe. Don’t skip this step—it’s crucial for that tangy, slightly spicy flavor profile.
5. Add all your spices. Cumin, chili powder, garlic powder, paprika, and cayenne if you’re feeling spicy. Just dump them all in. This isn’t chemistry class; precision isn’t critical here.
6. Whisk everything together. Use a fork, a whisk, whatever you’ve got. Just mix it until it’s smooth and all the spices are fully incorporated. Should take about 30 seconds of actual effort.
7. Taste and adjust. This is where you become the boss. Need more lime? Add it. Want it spicier? More cayenne. Too thick? Thin it with a tiny bit of water or more jalapeño juice. Make it yours.
8. Refrigerate for at least 30 minutes. I know, waiting is the worst, but this lets all the flavors meld together and get cozy. Trust me, it’s worth it.
Common Mistakes to Avoid
Look, this recipe is pretty foolproof, but people still manage to mess things up. Here’s what NOT to do:
Using low-fat mayo. Please don’t. Low-fat mayo is just sad water pretending to be sauce. Full-fat is where the magic happens. This isn’t a salad; it’s a condiment meant for joy.
Skipping the jalapeño juice. Some people see this and think, “Eh, I’ll just add more lime.” Wrong. The jalapeño brine has a specific flavor that lime can’t replicate. It’s tangy, slightly sweet, and has that pickle-y goodness that makes this sauce taste like the real deal.
Over-mixing. Once everything’s combined and smooth, stop. You’re making sauce, not whipped cream. Over-whisking won’t improve anything and might actually make the texture weird.
Not refrigerating it. Yes, technically you can eat it immediately, but it won’t taste nearly as good. The flavors need time to hang out and become friends. Give it at least 30 minutes, preferably an hour.
Being afraid of adjustments. This isn’t a cake where precise measurements matter. Taste as you go and adjust accordingly. Your taste buds are the best measuring tool you’ve got.
Alternatives & Substitutions
Need to swap something out? No problem.
Mayo alternatives: Greek yogurt works if you want something lighter, though it’ll be tangier and less rich. You could also try avocado oil mayo if you’re feeling fancy or avoiding certain ingredients.
Sour cream substitute: Plain Greek yogurt works here too, or you could use crema mexicana for an even more authentic vibe. Some people swear by cashew cream if you’re going dairy-free.
No jalapeño juice? You can use a tiny bit of pickle juice plus a pinch of red pepper flakes. It’s not identical, but it’ll get you close enough. Or finely mince a fresh jalapeño and add a splash of white vinegar.
Spice adjustments: If you can’t find chili powder, paprika with a pinch of cayenne works. No cumin? Your sauce will survive, though it might taste slightly less complex. IMO, cumin is pretty important, but desperate times and all that.
Making it spicier: Add hot sauce (make sure it’s gluten-free), more cayenne, or even a tiny bit of chipotle powder for smoky heat. If you’re going full lava mode, minced habanero will do the trick—just wear gloves and don’t touch your face.
Thinner consistency: Add water or more lime juice one teaspoon at a time. Some people prefer a drizzle-able sauce rather than a thick spread. You do you.

Final Thoughts
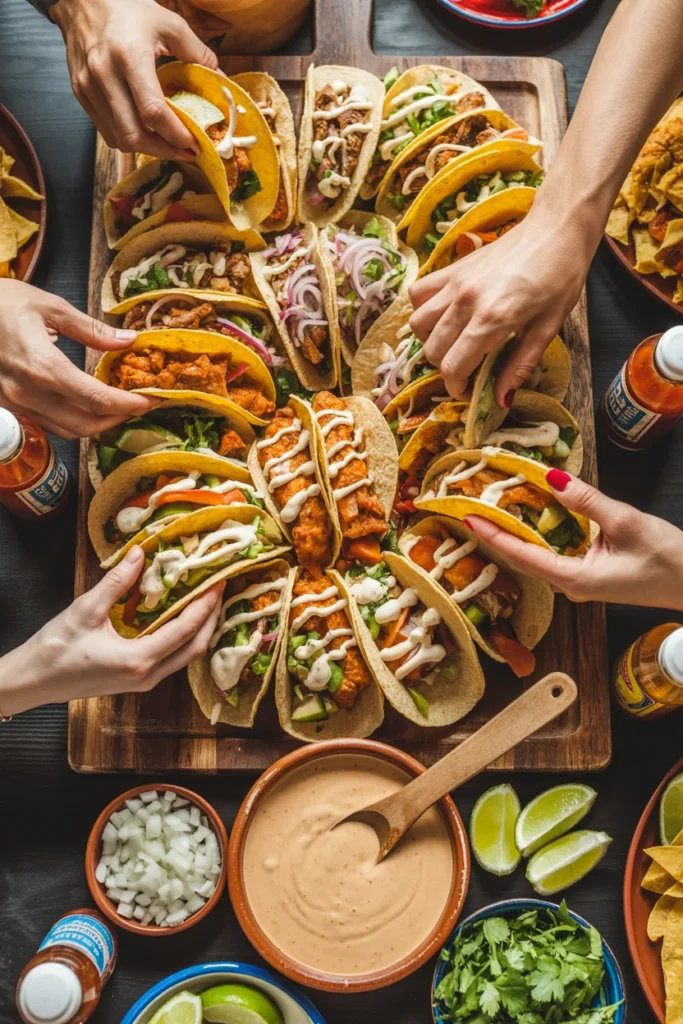
There you have it—the easiest sauce you’ll ever make, and probably one of the most versatile. Seriously, once you realize how simple it is to whip up restaurant-quality sauces at home, you’ll wonder why you ever bought the jarred stuff. This Baja sauce is perfect for taco night, meal prep, or just having something delicious to slather on your midnight quesadilla.
The best part? You can adjust it however you want. Make it spicier, tangier, creamier—whatever floats your boat. It’s your kitchen, your rules. And unlike complicated recipes that require specialty equipment or ingredients you’ll never use again (looking at you, gluten-free canning apples recipes), this one just works with basic pantry staples.
Now go forth and sauce everything in sight. Your tacos deserve better than naked tortillas, and you deserve to feel like a kitchen wizard without actually doing anything complicated. Pair it with gluten-free penne rosa recipe for an unexpected fusion dinner, or just keep it traditional with Tuesday taco night. Either way, you’ve got this.
You’ve earned your culinary bragging rights. Use them wisely.
FAQ (Frequently Asked Questions)
Can I make this ahead of time?
Absolutely! In fact, it’s better if you do. This sauce actually improves after sitting in the fridge for a few hours or even overnight. The flavors marry together and get more cohesive. It’ll keep for about a week in an airtight container, though it probably won’t last that long because you’ll put it on everything.
Is this actually gluten-free?
Yes, all these ingredients are naturally gluten-free. Just double-check your mayo and spice labels if you’re super sensitive or have celiac disease. Most mainstream brands are fine, but cross-contamination can happen in manufacturing facilities. When in doubt, check the label or stick with certified gluten-free brands.
What should I put this sauce on?
Everything. Literally everything. Tacos, burritos, quesadillas, nachos, grilled fish, chicken, vegetables, french fries, eggs, sandwiches—the possibilities are endless. I’ve even used it as a salad dressing, and it slapped. Don’t limit yourself here.
Can I freeze this sauce?
Technically yes, but the texture gets weird when you thaw it. Mayo-based sauces don’t love the freezer. If you’re really desperate, you can try it, but I’d recommend just making smaller batches more frequently instead. It’s so quick to make that there’s really no point in freezing it.
How spicy is this sauce?
Pretty mild, honestly. It has a gentle kick from the spices and jalapeño juice, but it’s not going to make you cry. If you want more heat, add extra cayenne or hot sauce. If you want it even milder, skip the cayenne entirely and reduce the jalapeño juice to half a teaspoon.
Can I make this dairy-free?
Yep! Use vegan mayo and swap the sour cream for dairy-free yogurt or cashew cream. The flavor will be slightly different, but it’ll still be delicious. Just like with gluten-free vegan lentil soup recipe, finding the right plant-based substitutes makes all the difference.
Why does mine taste different from Taco Bell’s?
Because you’re a human making sauce in your kitchen, not a fast-food corporation with proprietary ingredient lists and industrial equipment. Your version might be slightly different, but that’s not a bad thing. FYI, homemade almost always tastes better because you’re using fresh ingredients and can customize it to your preferences.
I’m Dr. Shivani, a Kolkata-based nutritionist since 2015. After 10 years of igniting a love for healthy eating in young minds as a High School nutritionist teacher, I now help individuals unlock their full potential through personalized diet plans. My passion for writing and sharing nutrition knowledge (through blogs and observations) keeps my practice fresh and fuels my love for the field!