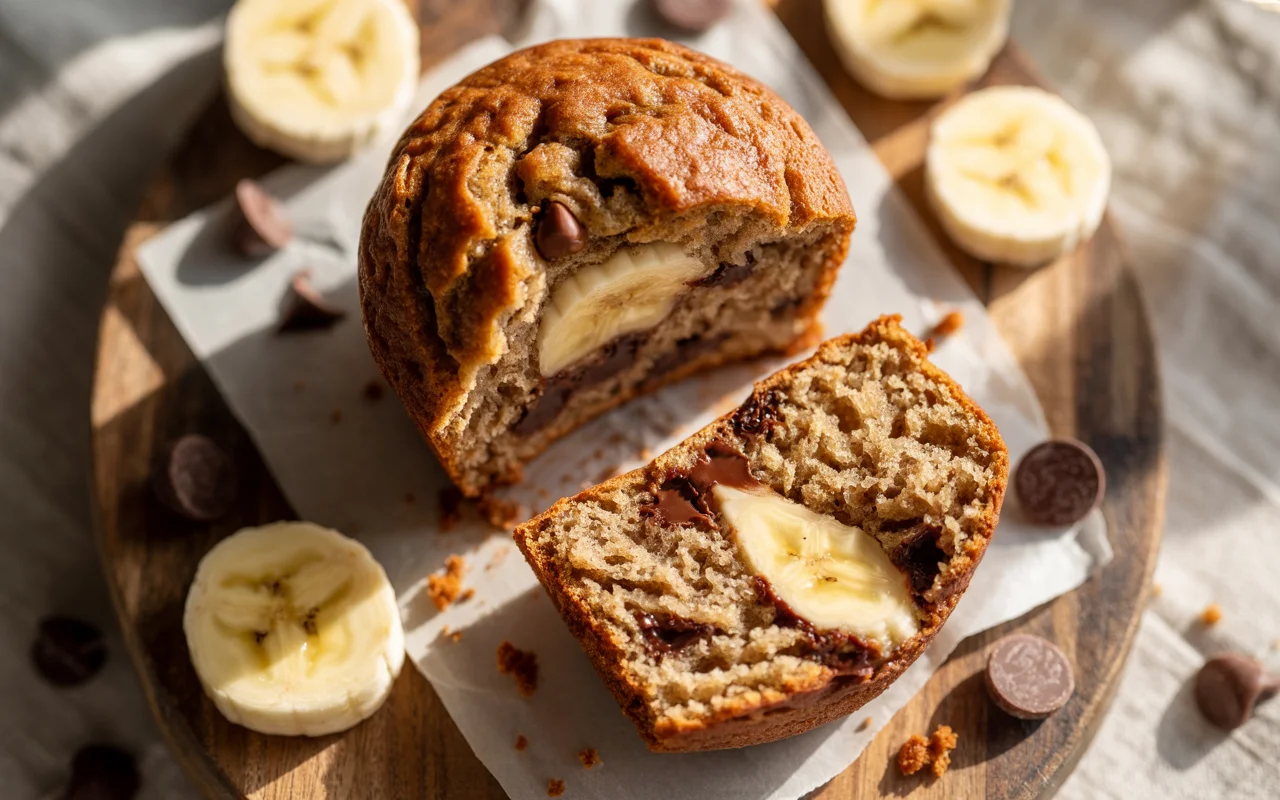
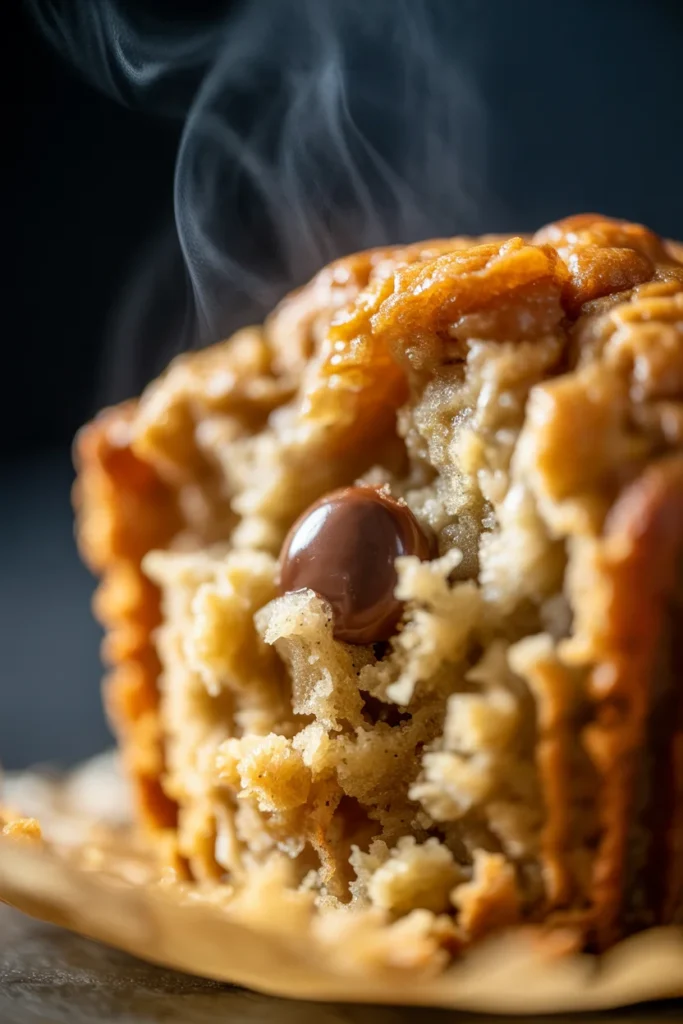
Gluten-free banana muffins recipe that’s moist, fluffy & foolproof! Ready in 30 minutes with simple ingredients. No weird flours needed. Perfect every time!
So your bananas are turning brown on the counter, judging you silently, and you’re gluten-free now—whether by choice or because your stomach decided to stage a rebellion.
Either way, you need a solution that doesn’t taste like cardboard. Enter: these ridiculously good gluten-free banana muffins that even your gluten-loving friends will steal when you’re not looking.
These babies are moist (sorry, but it’s the only word that works here), naturally sweet, and require zero fancy equipment. Just a bowl, a fork, and the willingness to turn on your oven. That’s it. No stand mixer. No food processor. Just you, some overripe bananas, and about 30 minutes until warm, fluffy muffin heaven.
Why This Recipe is Awesome
Let’s be real—gluten-free baking can be a minefield. One wrong move and you’ve got hockey pucks instead of muffins. But this recipe? It’s basically foolproof. I’ve made these while half-asleep on a Sunday morning, and they still turned out great.
First off, you don’t need weird ingredients you’ll only use once. No xanthan gum, no seventeen different flours. Just regular gluten-free flour blend and stuff you probably already have. Second, these muffins actually taste like something you’d want to eat, not something you’re choking down because you have to. The banana keeps them super moist, and the texture is spot-on—none of that crumbly, dry nonsense.
Plus, they freeze beautifully, which means you can meal prep like a responsible adult and then feel smugly superior when you have fresh-tasting muffins ready in 30 seconds. You’re welcome.
And if you’re looking for more gluten-free recipes that nail the texture game, you’ll want to check out our gluten-free Christmas crack recipe. It’s another ridiculously simple recipe that proves gluten-free baking doesn’t have to be complicated—just four ingredients and you’re golden. Perfect for when you need something sweet but don’t want to commit to a full baking project.
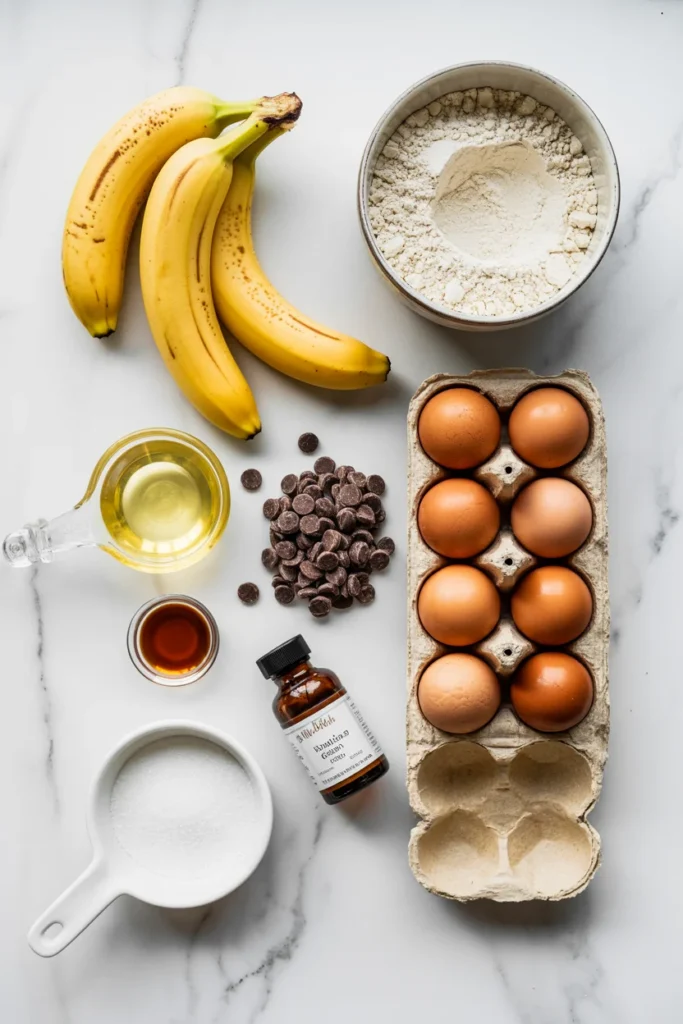
Ingredients You’ll Need
Here’s what you’re working with:
- 3 ripe bananas (the uglier, the better—brown spots are your friend)
- 2 cups gluten-free all-purpose flour (use one with xanthan gum already in it, or add ½ tsp separately)
- ⅓ cup melted coconut oil or butter (pick your fighter)
- ¾ cup sugar (white, brown, or coconut sugar all work)
- 2 large eggs (room temp if you’re fancy)
- 1 tsp vanilla extract (the real stuff, not that fake nonsense)
- 1 tsp baking soda
- ½ tsp salt
- ¼ cup milk of choice (dairy, almond, oat—whatever doesn’t make your body angry)
- Optional: ½ cup chocolate chips or walnuts (because why not live a little?)


Step-by-Step Instructions
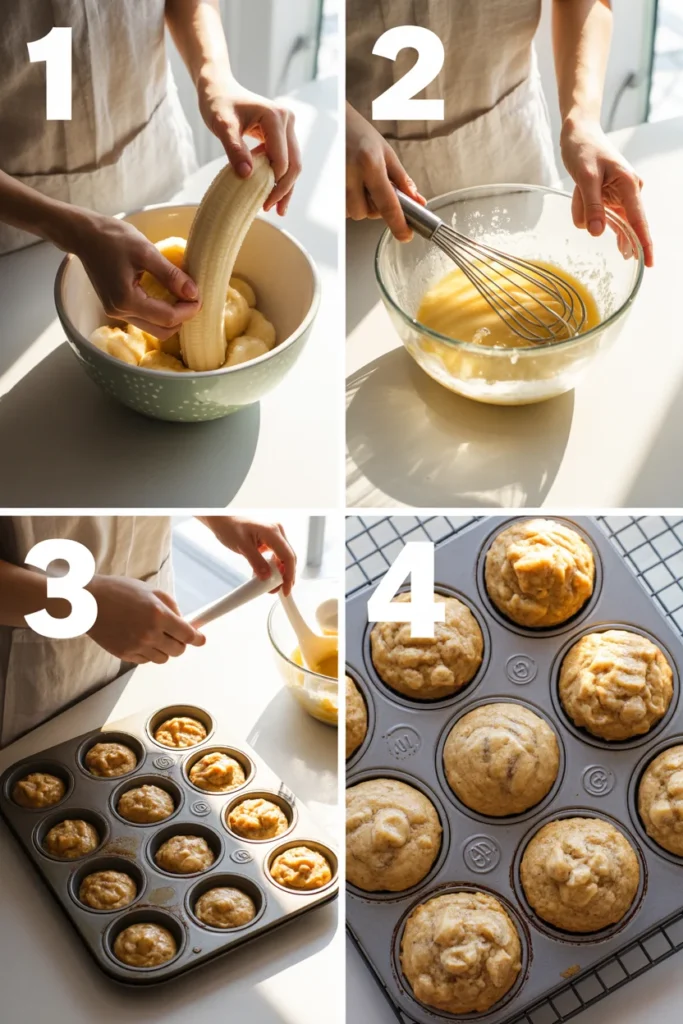
1. Preheat your oven to 350°F (175°C). Line a 12-cup muffin tin with paper liners or grease it well. Don’t skip the preheating—I know you want to, but trust me on this one.
2. Mash those bananas. Grab a fork and go to town in a large bowl. Get them smooth-ish—a few lumps are fine, we’re not making baby food here. You should have about 1½ cups of mashed banana.
3. Mix in the wet stuff. Add your melted oil or butter, sugar, eggs, vanilla, and milk to the banana bowl. Stir it all together until combined. It doesn’t need to be perfect—this is rustic baking, baby.
4. Add the dry ingredients. Dump in your flour, baking soda, and salt. Gently fold everything together until just combined. Seriously, don’t overmix—gluten-free batter gets weird and tough if you go crazy here. A few flour streaks are okay.
5. Fold in your add-ins. If you’re using chocolate chips or nuts (which you absolutely should), gently stir them in now. Save a few to sprinkle on top because presentation matters, or whatever.
6. Fill those muffin cups. Scoop the batter into your prepared tin, filling each cup about ¾ full. An ice cream scoop works great for this—keeps everything even and your hands clean.
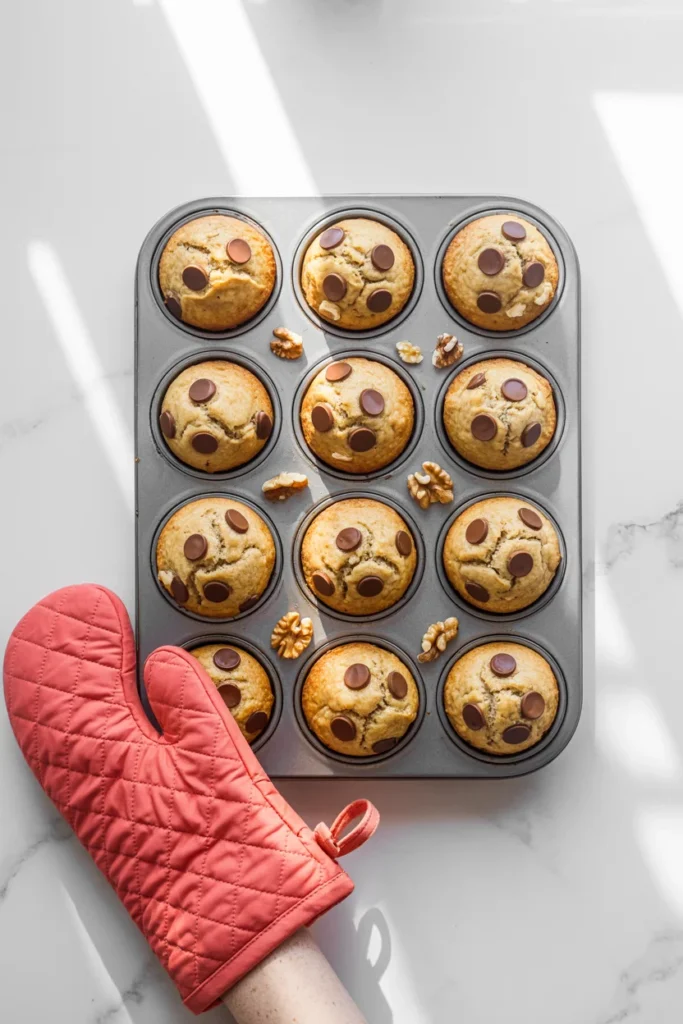
7. Bake for 20-25 minutes. You’ll know they’re done when a toothpick inserted in the center comes out clean or with just a few crumbs. The tops should be golden and smell incredible.
8. Cool and devour. Let them cool in the pan for 5 minutes, then transfer to a wire rack. Or just eat one hot because you have zero self-control—no judgment here.


Common Mistakes to Avoid
Using bananas that aren’t ripe enough. If your bananas are still yellow-green, just stop. The muffins won’t be sweet enough, and the texture will be off. Wait for brown spots, people.
Overmixing the batter. This isn’t a workout. Mix until things are just combined, then put the spoon down and back away slowly. Overmixing = dense, tough muffins.
Skipping the room temperature eggs. Cold eggs don’t incorporate as well and can make your batter clumpy. Run them under warm water for a minute if you forgot to take them out.
Thinking all gluten-free flours are the same. They’re not. Use a good all-purpose blend like Bob’s Red Mill or King Arthur. Single-grain flours (like just rice flour or almond flour) won’t work here without serious recipe adjustments.
Opening the oven door constantly. I know you’re excited, but every time you peek, you let heat escape. Your muffins need steady temp to rise properly. Be patient.

Alternatives & Substitutions
Sugar: You can swap white sugar for coconut sugar or brown sugar for a deeper flavor. Honey or maple syrup work too, but reduce the milk by 2 tablespoons to compensate for the extra liquid.
Oil/Butter: Melted coconut oil gives a subtle tropical vibe (IMO it’s the best option), but vegetable oil or melted butter work great too. Applesauce can replace half the oil if you want to lighten things up.
Flour: Stick with a quality gluten-free blend. If you want to use almond flour, you’ll need to adjust the ratios significantly—not recommended unless you’re feeling adventurous.
Eggs: Flax eggs (1 tbsp ground flaxseed + 3 tbsp water per egg) work for making these vegan, but the texture will be slightly denser.
Add-ins: Get creative! Blueberries, chopped pecans, cinnamon chips, peanut butter chips—this recipe is a blank canvas for your cravings.
Speaking of creative flavor combos, if you love the idea of fruit in your baked goods, our gluten-free fruit tart recipe takes it up a notch. It’s more of a showstopper dessert, but uses similar principles of keeping things simple and delicious. Great for when you want to graduate from muffins to something that’ll really impress your brunch guests.
Final Thoughts
Look, you now have a recipe for gluten-free banana muffins that actually slap. No weird aftertaste, no complicated steps, no specialty stores required. Just simple, wholesome ingredients coming together to create something way better than you’d expect.
Make a batch this weekend. Freeze half of them if you’re feeling responsible. Eat three in one sitting if you’re not. Either way, you’re winning. And those brown bananas? Finally getting the respect they deserve.
Now go forth and bake. Your kitchen (and your taste buds) will thank you. You’ve got this! 🍌
FAQ (Frequently Asked Questions)
Can I make these without eggs?
Yep! Use flax eggs or chia eggs as mentioned above. They won’t be quite as fluffy, but they’ll still be delicious and 100% vegan-friendly.
My muffins came out dense. What happened?
Probably overmixing. Gluten-free batter is delicate—treat it like your feelings and don’t go too hard. Also, check that your baking soda is fresh. Old leavening agents = sad, flat muffins.
Can I reduce the sugar?
Sure, but go easy. You can probably drop it to ½ cup without major issues, especially if your bananas are super ripe. Less than that and you’re risking dry, bland muffins.
How do I store these?
Room temperature in an airtight container for 2-3 days, fridge for up to a week, or freeze for up to 3 months. Pop frozen ones in the microwave for 30 seconds and they taste freshly baked.
Can I make this as a loaf instead?
Absolutely! Use a greased 9×5-inch loaf pan and bake at 350°F for 50-60 minutes. Check with a toothpick to make sure it’s done in the center.
Do these taste “gluten-free”?
Nope! That’s the beauty of this recipe. The banana and moisture content mask any weird gluten-free flour taste. Your non-GF friends won’t even notice.
Can I use regular flour if I don’t need gluten-free?
You can, but why are you here then? Just kidding—yes, swap cup-for-cup with regular all-purpose flour and they’ll work perfectly.
I’m Dr. Shivani, a Kolkata-based nutritionist since 2015. After 10 years of igniting a love for healthy eating in young minds as a High School nutritionist teacher, I now help individuals unlock their full potential through personalized diet plans. My passion for writing and sharing nutrition knowledge (through blogs and observations) keeps my practice fresh and fuels my love for the field!