Crispy, juicy gluten-free baked chicken hindquarters recipe that practically cook themselves. Simple spices, 45 minutes, zero stress. Perfect for busy weeknights!
So you grabbed a pack of chicken hindquarters because they were on sale, and now you’re staring at them like, “What now?” I get it. These bad boys—the drumstick-thigh combo that basically screams “I’m here for flavor”—deserve better than your usual panic-cook routine.
And if you’re going gluten-free? Even better. This recipe is so simple, you’ll wonder why you ever complicated things in the first place.
Why Gluten-Free Baked Chicken Hindquarters Recipe is Awesome
Let me level with you: baked chicken hindquarters are basically foolproof. They’ve got dark meat (translation: juicy, flavorful, forgiving), skin that crisps up like magic, and they’re naturally gluten-free before you even start seasoning. No breading drama, no “did I contaminate this?” panic—just pure, unapologetic chicken goodness.
Plus, they’re cheap. Like, actually affordable. While everyone’s dropping $20 on fancy cuts, you’re over here getting restaurant-quality results for the price of a fancy coffee.
This recipe takes about 10 minutes of actual work, then the oven does the heavy lifting while you binge-watch something or pretend to be productive.
And honestly? The leftovers (if there are any) are chef’s kiss. Cold chicken hindquarters the next day? Incredible. Reheated? Still amazing. These things are the MVP of meal prep without trying to be.
Ingredients You’ll Need
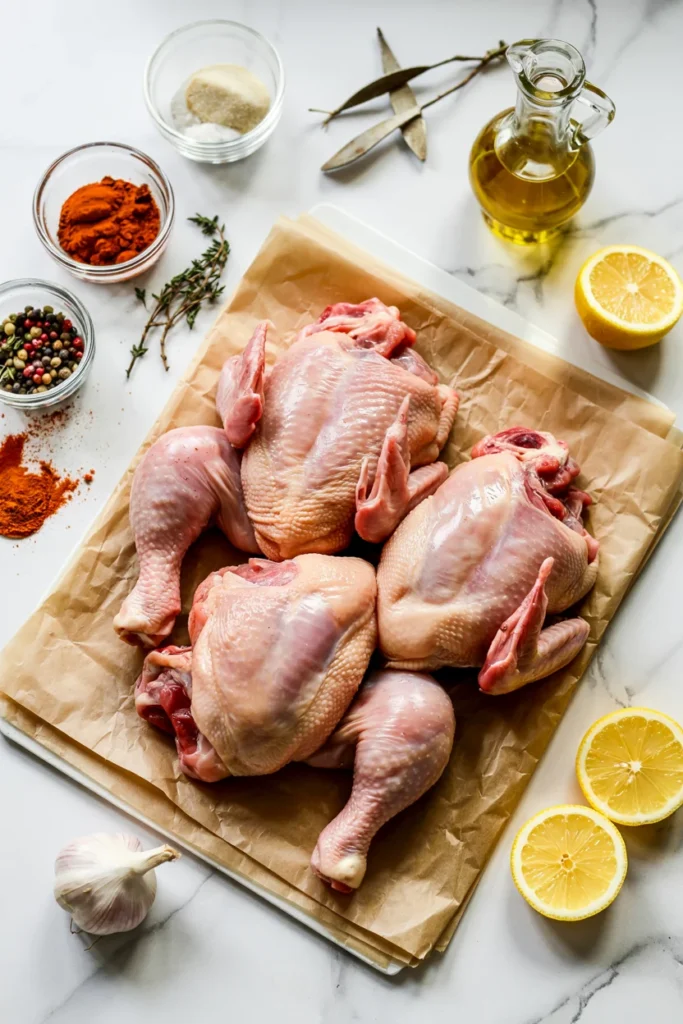
- 4-6 chicken hindquarters (about 2-3 lbs total—basically however many fit in your pan)
- 2 tablespoons olive oil (or avocado oil if you’re fancy)
- 1 tablespoon paprika (smoked if you want that extra vibe)
- 1 teaspoon garlic powder (fresh garlic works too, but powder is easier)
- 1 teaspoon onion powder
- 1 teaspoon dried thyme (or rosemary, oregano—whatever herb you’re feeling)
- ½ teaspoon black pepper
- 1 teaspoon salt (or more, we’re not the salt police)
- ½ teaspoon cayenne pepper (optional, only if you like a little kick)
- Juice of half a lemon (for brightness—trust me on this)
That’s it. No weird ingredients you’ll use once and forget about. Just straightforward stuff that makes chicken taste like you actually know what you’re doing.
Step-by-Step Instructions
1. Preheat your oven to 425°F (220°C). Yes, now. Not later when you remember. The oven needs to be screaming hot when these chickens go in.
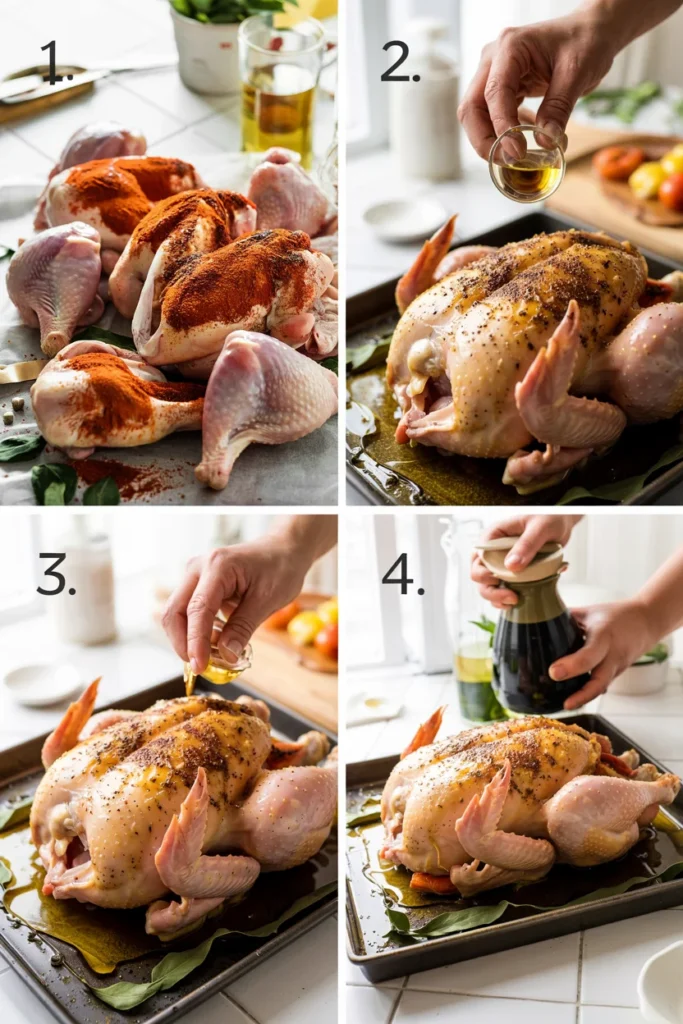
2. Pat the chicken hindquarters dry with paper towels. This isn’t optional if you want crispy skin. Wet chicken = sad, rubbery skin. Nobody wants that.
3. Mix your spices in a small bowl—paprika, garlic powder, onion powder, thyme, salt, pepper, and cayenne if you’re using it. Stir it up real good.
4. Drizzle the olive oil over the chicken, then rub it all over like you’re giving it a spa treatment. Get under those flaps, coat everything. Sprinkle your spice mixture generously over each piece, front and back. Don’t be shy.
5. Arrange the chicken skin-side up on a baking sheet lined with parchment paper or foil (for easy cleanup, because future you will thank present you). Give them a little space—they’re not sardines.
6. Squeeze that lemon juice over the top. Just a light drizzle to add some zing without making things soggy.
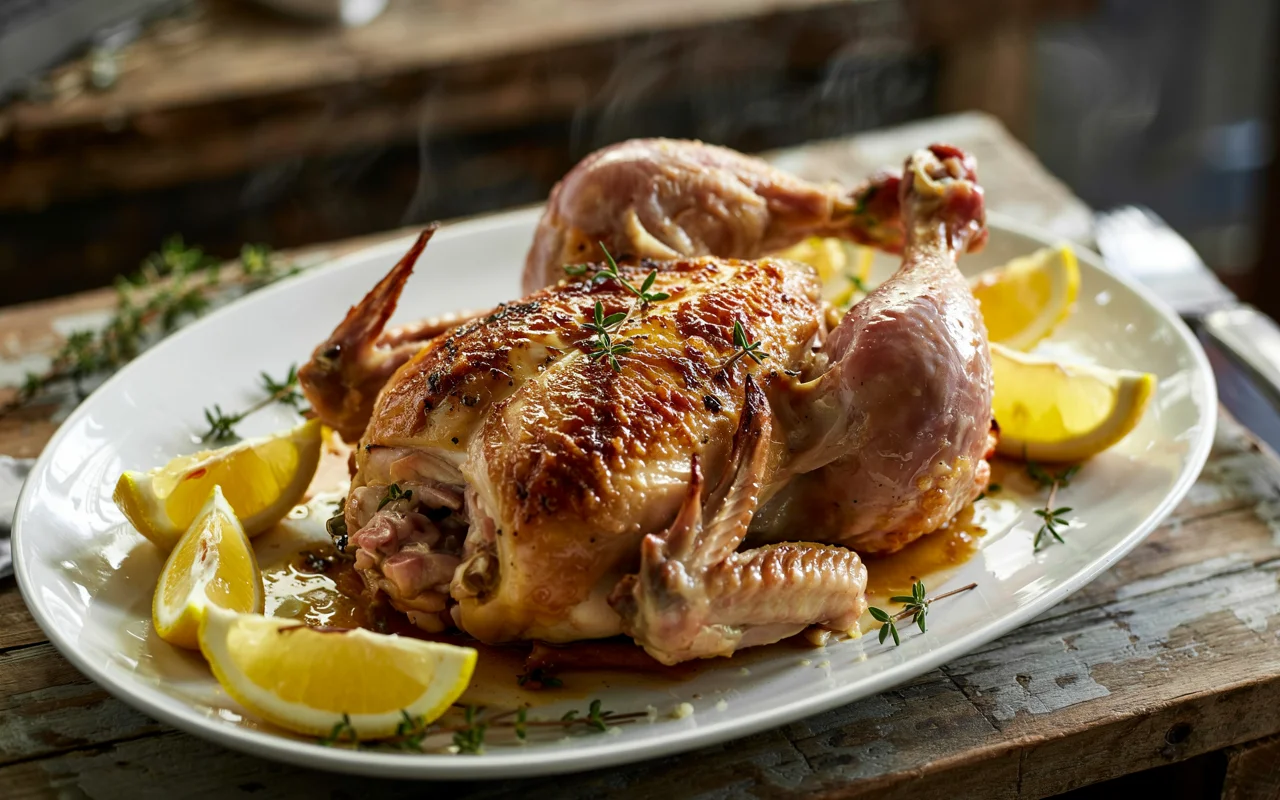
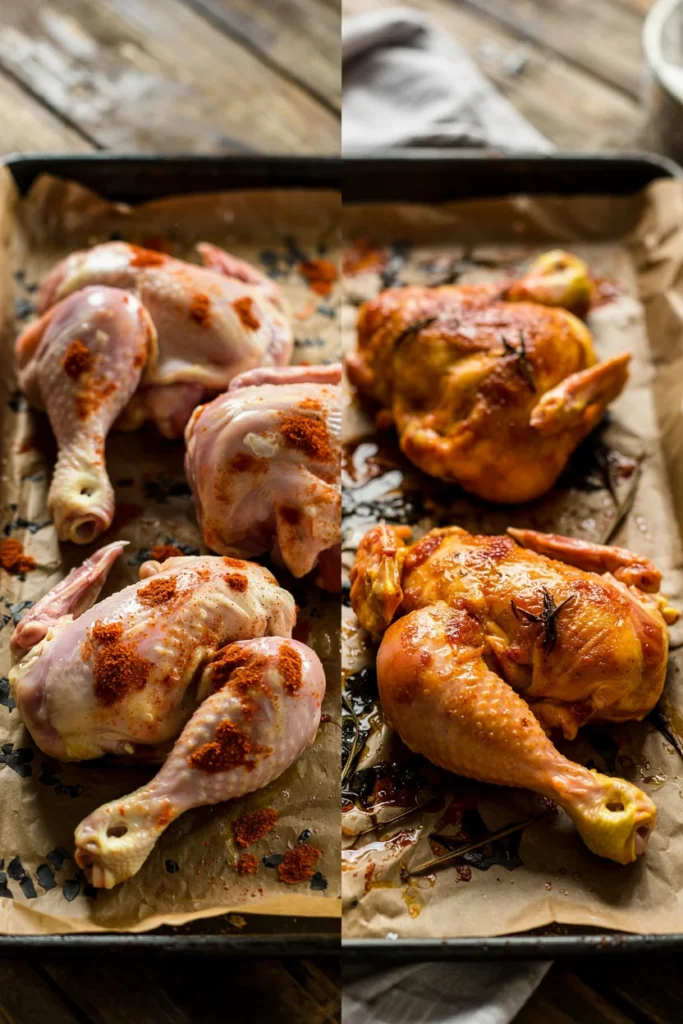
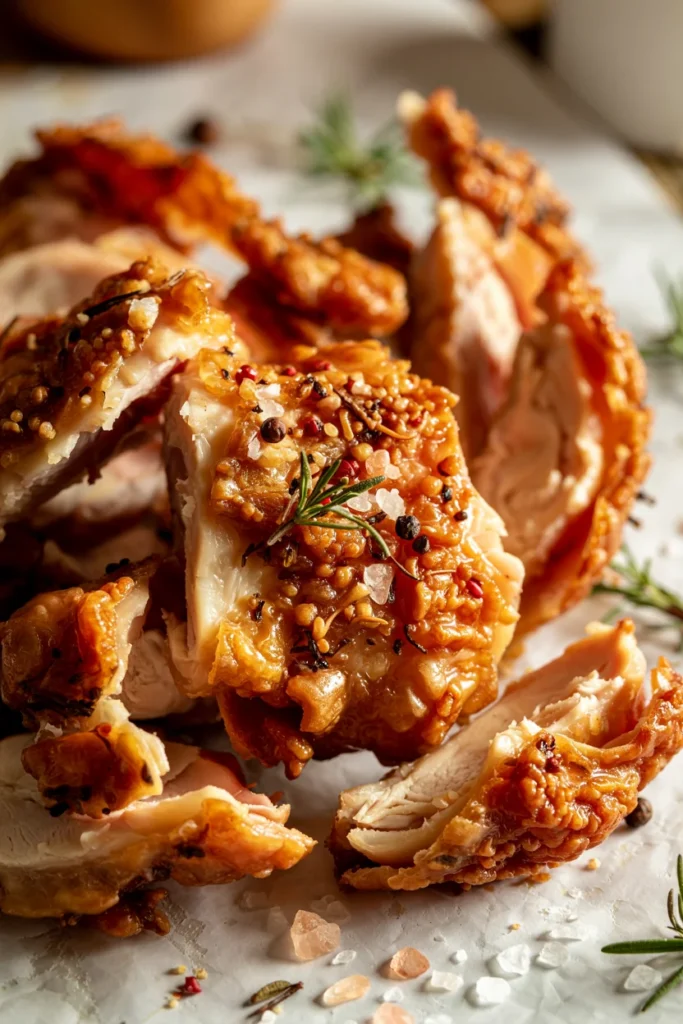
7. Bake for 40-45 minutes until the internal temperature hits 175°F (80°C) and the skin is golden and crispy. If you want extra crispy skin, turn on the broiler for the last 2-3 minutes—but watch it like a hawk or you’ll end up with charcoal.
8. Let them rest for 5 minutes before digging in. I know it’s hard, but this keeps the juices where they belong: inside the chicken, not all over your plate.
Common Mistakes to Avoid
Not drying the chicken first. Seriously, this is the #1 reason people end up with sad, floppy skin. Water is the enemy of crispiness.
Overcrowding the pan. Give your chicken room to breathe. If they’re touching, they’ll steam instead of roast, and you’ll miss out on that gorgeous golden crust.
Skipping the preheat. Yeah, I know your oven takes forever. Do it anyway. Starting in a hot oven = crispy skin. Starting cold = disappointment.
Opening the oven door every five minutes. Stop it. You’re letting all the heat out. Trust the process, trust the timer, and walk away.
Not using a meat thermometer. Look, guessing is how you end up with raw chicken (gross) or hockey pucks (also gross). Invest $10 in a thermometer and never worry again.
Alternatives & Substitutions
No hindquarters? Our guide to gluten-free chicken thigh recipes has you covered with similar techniques for bone-in thighs. The cooking time might be slightly shorter, but the flavor payoff is just as good.
Different spice profile? Swap the paprika and thyme for Italian seasoning, or go full Cajun with some oregano and extra cayenne. Want an Asian twist? Use sesame oil, ginger powder, and a splash of gluten-free tamari instead.
Dairy-free already, but if you want butter flavor, brush them with melted ghee or dairy-free butter in the last 10 minutes of cooking. Game-changer.
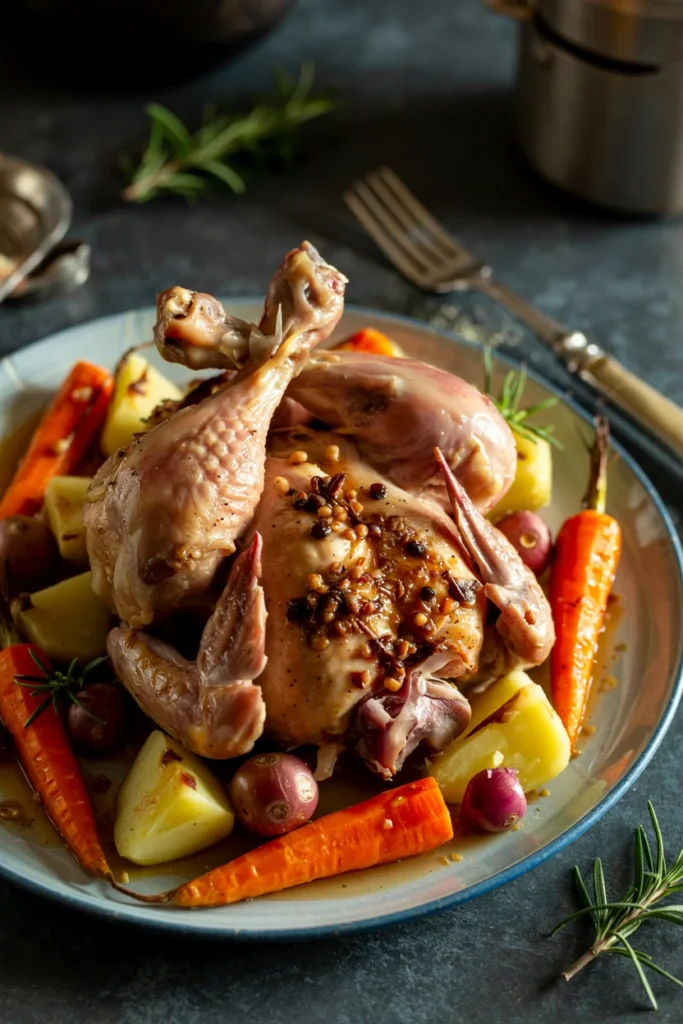
Vegetable sides? Throw some quartered potatoes, carrots, or Brussels sprouts on the same pan. They’ll roast in the chicken drippings and basically become vegetables you’ll actually want to eat. Win-win.

Final Thoughts
There you have it: crispy, juicy, gluten-free baked chicken hindquarters that require minimal effort and deliver maximum flavor. No complicated techniques, no specialty ingredients, just solid home cooking that happens to be naturally gluten-free.
The beauty of this recipe is how forgiving it is. Forgot to add the cayenne? Still delicious. Used drumsticks instead? Also great. Burned the skin a tiny bit? Extra crispy, totally intentional, moving on.
So preheat that oven, grab your chicken, and get ready to feel like an absolute kitchen rockstar. Whether you’re feeding yourself, your family, or meal-prepping for the week, these hindquarters are about to become your new go-to. Now go make something delicious—you’ve got this!
FAQ (Frequently Asked Questions)
Can I use chicken quarters instead of hindquarters?
Yep! Quarters include the breast too, so they’ll cook a bit faster. Check the breast meat at 35 minutes—it’s done at 165°F (74°C) while the dark meat can go higher.
Do I need to marinate these overnight?
Nah. The dry rub does plenty in the time it takes you to preheat the oven. If you want to prep ahead, season them up to 4 hours before and keep them in the fridge, but it’s not necessary.
What if I don’t have a meat thermometer?
The juices should run clear when you pierce the thickest part, and the meat should pull away from the bone easily. But IMO, just get a thermometer. They’re like $10 and save so much stress.
Can I make these in an air fryer?
For sure. Cook at 400°F (200°C) for about 25-30 minutes, flipping halfway through. If you love super crispy results, check out our gluten-free crispy chicken recipe for air fryer tips that’ll blow your mind.
Are the leftovers any good?
Are you kidding? These might be better the next day. Eat them cold, reheat them in the oven at 350°F for 10 minutes, or shred the meat for tacos, salads, or a killer gluten-free chicken casserole that’ll stretch your meal even further.
Can I freeze these after cooking?
Absolutely. Let them cool completely, wrap individually in foil, then freeze in a freezer bag for up to 3 months. Reheat from frozen at 350°F for 20-25 minutes.
What sides go best with this?
Literally anything. Roasted veggies, mashed potatoes, rice, salad, crusty gluten-free bread for soaking up those pan juices—there’s no wrong answer here.
I’m Dr. Shivani, a Kolkata-based nutritionist since 2015. After 10 years of igniting a love for healthy eating in young minds as a High School nutritionist teacher, I now help individuals unlock their full potential through personalized diet plans. My passion for writing and sharing nutrition knowledge (through blogs and observations) keeps my practice fresh and fuels my love for the field!